Side fill Mokes have a unique fuel gauge sender, and replacements have not been available for years. Luckily most of the internal parts are the same as a Mini, so with a bit of creative thinking and a new donor sender you can rebuild your old one to work like new.
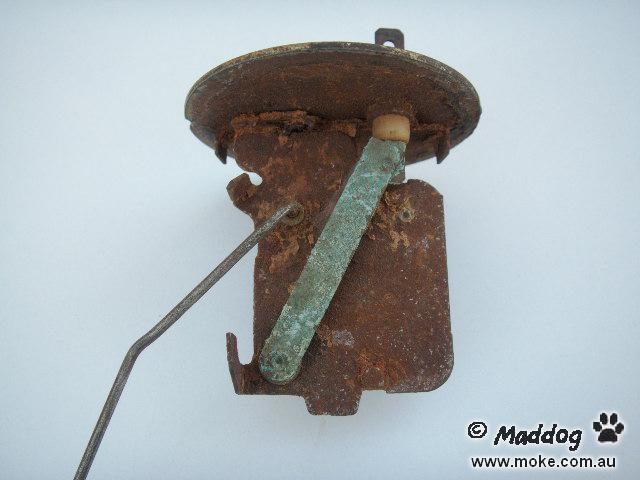
This is what I started with....and if this can be fixed then anything is possible!
 Unfortunately the Mini fuel sender is quite different. Because it mounts in the side of the tank not the top, the arm swings sideways and is a lot longer. The locating tabs are completely wrong, and it won't fit in a Moke tank. But they do have the same working parts, and in a bench test the gauge reads spot on using a Mini sender. So the easiest solution is to just swap all the new internal bits over to the old sender unit.
Start by drilling out the two brass rivets that hold the rheostat to the housing.
If yours is as bad as mine and you want to replace everything, also drill out the spot weld on the gauge terminal. You can then knock out the terminal itself using a peice of 6mm rod with a hacksaw cut in the end.
Now bend up the tabs on the cover plate with a sharp screwdriver.
Normally the cover will just fall off, but as usual this one wanted a fight. A bit of penetrene, a wire brush and a few swear words and I won.
I guess that's why it wasn't working! This is what the new one looks like....
To get the arm out I had to use a small pin punch and tap it out from the side the tabs were on, but usually they will just fall out and you can thread the arm through the hole. Push the remains of the rivets out and remove the rheostat.
I gave it a good bead blast and sent it off to the platers.
Ahhh.....that's better!
Now to strip out the parts from the mini sender. Same as before, drill out the two brass rivets and remove the cover plate. Thread the arm out through the hole and remove the rheostat and insulating plate. These are the parts you need...
Instead of rivets I used 2mm bolts to hold the new rheostat on - 1 x 6mm long and 1 x 10mm long with a flat and shakeproof washer for each.
Bolts this small can be hard to find, but I found a packet of assorted ones in an electronics shop. Hobby shops are another good place to try. If you can't find any, you can use 3mm bolts, but you will have to drill out the smaller uninsulated hole at the top. The lower longer bolt must be insulated, and the plastic bush will be very thin if you drill it out too much. Try drilling it smaller than the bolt and screwing the bolt in. This is the insulating bush on the back of the rheostat...
And this is the end of the rheostat wire that needs to be connected to the fuel gauge.
Put the longer bolt and flat washer through this hole and wind the rheostat wire around the bolt between the head and the washer - you may need to unwind it from the securing hole to get enough to play with, but mine was through there twice anyway.
Put the thin insulating pad on the sender the right way round (one hole is larger than the other), and put the rheostat back on top. Check the insulating bush is centred in the bottom hole.
Slip the plastic spacer on the lower bolt, then the contact strip, shakeproof washer and nut.
Do the same at the top, and tighten both. Try not to turn the insulated screw in case the wire gets twisted and snaps - do the nut up instead (and good luck finding a spanner small enough! I had to use pliers).
If you removed the terminal, tap the new one back in and solder the brass strip back on. You can use the wire off the new sender if you prefer, shortened to suit.
Next you need to decide which arm to use. Obviously it is easier to use the old one, but you need to carefully inspect the contact on the end. It should be round and smooth, with no burrs or flat spots.
If it looks good like this, then it will be fine to put back. Anything less I would suggest you use the new arm - it only takes a few minutes to bend, and will only go in the bin otherwise. The mini arm is just long enough, and you can do a quick modification to make sure the float stays put too.
The first bend on the mini arm is okay, but you need to straighten out the float loop to get enough length. The wire is very springy, so a vice is probably easier and safer than pliers.
When bending the float loop wrap it around something smaller than the float as it will spring back a fair bit. I used a bit of 3/4" tube.
If you don't want the float to come off, continue bending the loop right around and then back at a right angle.............something like this.
When you attach the float twitch the ends together with a bit of soft wire (but don't do it until you're finished, or you won't get the arm back in).
Once the arm is back in, check the contact hasn't moved on the arm by working the arm from full to empty - it should stay on the wound wire with about an equal gap at both ends.
Full....
....and empty.
If you want to check the accuracy, plug it into the sender wire on your moke and use a suitable wire to earth the sender body. It will take a while for the reading to stabilize, and the arm may not earth properly without the cover on. The float shouldn't be higher than the mounting plate when full, and shouldn't go lower than the depth of the tank when empty - around 7 inches.
If you're happy it's all working, put the cover back on and bend the tabs back. Don't forget the spring on the arm!
And finally, to make sure the nuts don't come loose I gave them a couple of good coats of very cheap nail polish. A dob of solder will do the same job.
All done and good as new!
Enjoy!